For anyone still relying upon virtual reality (VR) applications written for the OpenGL API rather than the Vulkan API that has been dominant among VR apps (and other modern games / software) for years, the Mesa code and in particular the Zink OpenGL-on-Vulkan driver now supports the OpenGL VR (OVR) extensions...
An interesting merge request opened this week and already merged for Mesa 24.3 comes from an Autodesk engineer adding Vulkan Windowing System Integration (WSI) around Apple's Metal API for use on macOS...
With roots in Africa, the kalimba is a type of hand piano featuring an array of keys that are each tuned for a specific note, and upon plucking or striking one, a pleasant xylophone-like sound can be heard. Taking inspiration from his mini kalimba, Axel from the YouTube channel AxelMadeIt sought to automate how its keys are struck and produce classical melodies with precision.
The design process started out with Axel determining the best mechanism for interacting with the small keys, and after hitting/plucking them using a range of objects, he settled on plucking individual keys with a small plastic actuator. Two servo motors were utilized to perform the action, with one motor sliding a gantry left-and-right, and the other moving a small plastic pick across the keys. Axel’s design underwent several iterations to get the sound correct since material thickness, the lack of a resonant backing, and a loud servo motor all contributed to reduced quality initially.
After perfecting the physical layout, Axel assembled the electronic components into a custom 3D-printed case, which includes spaces for the Arduino Nano, battery, charging circuit, and pushbuttons. The first two buttons cause the kalimba to play preprogrammed melodies, while the last one plays random notes with a random amount of delay in between.
The FFmpeg multimedia library continues to enhance its support around the Vulkan Video APIs with the latest commits seeing H.264 and H.265/HEVC Vulkan encode support merged...
Seeed Studio has launched a Kickstarter campaign for the SenseCAP Watcher, a physical AI agent capable of monitoring a space and taking actions based on events within that area. Described as the “world’s first Physical LLM Agent for Smarter Spaces,” the SenseCAP Watcher leverages onboard and cloud-based technologies to “bridge the gap between digital intelligence and physical applications.” The SenseCAP Watcher is powered by an ESP32-S3 microcontroller coupled with a Himax WiseEye2 HX6538 chip (Cortex-M55 and Ethos-U55 microNPU) for image and vector data processing. It builds on the Grove Vision AI V2 module and comes in a form factor about one-third the size of an iPhone. Onboard features include a camera, touchscreen, microphone, and speaker, supporting voice command recognition and multimodal sensor expansion. It runs the SenseCraft software suite which integrates on-device tinyML models with powerful large language models, either running on a remote cloud server or a local computer [...]
If you want to make PCBs at home and you don’t happen to own a CNC mill, then you’ll probably need to turn to chemical etching. Use one of several different techniques to mask the blank PCB’s copper that you want to keep, then toss the whole thing into a bath to dissolve away the unmasked copper. Unfortunately, the last step can be slow, which is why Chris Borge built this PCB agitator.
Alton Brown’s philosophy on “unitaskers” is wise when it comes to the kitchen, but things are different in the workshop. Sometimes a tool or machine is so useful that it is worth keeping around — even if it only does one job. That’s the case here, because Borge’s machine only does one thing: tilts back and forth. If a container with a PCB in an etchant bath is sitting on top of the machine, that action will slosh the chemicals around and the agitation will dramatically speed up the process.
On a mechanical level, this is extremely simple. It only requires a handful of 3D-printed parts, some fasteners, and a couple of bearings. The bearings provide a rotational interface between the stationary base (weighed down with poured concrete) and the pivoting platform. The electronics are even simpler and consist of an Arduino Nano board and a small hobby servo motor. The Arduino just tells the servo motor to move back and forth endlessly, tilting the platform and providing constant agitation.
For those wondering about the performance of the NVIDIA RTX 6000 Ada Generation workstation performance on Ubuntu 24.04 LTS with the up-to-date NVIDIA Linux graphics drivers now relying on the open-source kernel modules, this article is for you in looking at the performance of this high-end workstation graphics card on the up-to-date Linux software stack. The NVIDIA RTX 6000 Ada Generation is tested alongside the RTX 2000 / 4000 Ada Generation graphics cards and also the AMD Radeon PRO W7000 series competition atop Ubuntu 24.04 LTS.
Changing careers can be a major decision, especially in today’s fast-paced tech world. Professionals are spoilt for choices like for example a computer vision career. If you’re considering a shift and want to apply your current skills in a new and exciting direction, this guide is here to help.
This article is a step-by-step resource to show you how to make the transition, from understanding the basics of computer vision to building the necessary skills and portfolio to get started. With this guide, you’ll know exactly what steps to take to make the change successfully.
STEP1⃣: Identifying Transferable Skills for a Smooth Transition into Computer Vision
When transitioning to a career in computer vision, one of the most reassuring aspects is that many of the skills you’ve already developed can be useful. Let’s break down some key transferable skills:
Programming Skills: If you’re already familiar with languages like Python or C++, you’re on the right track. These languages are widely used in computer vision, particularly Python, due to libraries like OpenCV and TensorFlow. Even a basic understanding of coding can be a great starting point since many tutorials and projects will build on what you already know.
According to a survey from TealHQ, 60% of computer vision professionals come from a software engineering background, highlighting the demand for strong programming abilities.
Mathematical Foundation: Understanding concepts in linear algebra, calculus, and probability is vital in computer vision. These fields form the backbone of algorithms used in image recognition, object detection, and machine learning models. If you’ve ever worked with data analysis, finance, or engineering, you’ve likely applied these concepts already.
Don’t worry if you’re not an expert—there are plenty of beginner-friendly resources to help you brush up on the essentials.
Analytical Thinking: Problem-solving is at the core of computer vision. If you’ve worked in roles that required you to analyze data, troubleshoot, or think critically, you already have a valuable mindset. Computer vision often requires breaking down complex problems into smaller steps, which is very similar to tasks in other technical fields.
Domain Knowledge: One of the overlooked but important areas is domain-specific expertise. For example, if you have experience in healthcare, manufacturing, or transportation, your knowledge can help you apply computer vision solutions in those industries. Many employers look for candidates who can bring both technical skills and industry experience to the table.
STEP2⃣: Learning Resources and Courses for Beginners
Transitioning into computer vision requires learning new concepts and tools, but fortunately, there are numerous accessible resources to help you get started. Here are some beginner-friendly options:
Fast.ai: Practical Deep Learning for Coders – If you’re interested in the deep learning side of computer vision, this course offers real-world applications in a straightforward manner.
Books:
Deep Learning by Ian Goodfellow – A comprehensive resource for understanding the theory behind machine learning and computer vision.
Learning OpenCV by Gary Bradski and Adrian Kaehler – A practical guide focused on one of the most important libraries in computer vision, ideal for hands-on learners.
Websites and Blogs:
OpenCV.org – The official website for OpenCV is a treasure trove of tutorials, documentation, and community support.
Learnopencv.com – A blog filled with tutorials and practical guides on computer vision topics.
Towards Data Science – A popular platform where professionals share insights, tutorials, and cutting-edge research in the field.
STEP3⃣: Building a Computer Vision Portfolio from Scratch
One of the most important steps in your career transition is building a portfolio that demonstrates your skills. A strong portfolio shows potential employers that you can apply what you’ve learned to real-world problems. Here’s how to get started:
Start Small: Begin with basic projects, such as image classification or object detection. These foundational tasks are relatively simple but show your ability to work with computer vision tools and datasets. You can find plenty of tutorials and datasets online to guide you through your first projects.
Use Open Datasets: Data is key in computer vision, and thankfully, there are plenty of publicly available datasets. Websites like Kaggle and university repositories provide access to datasets ranging from simple images to complex 3D data. These datasets allow you to work on interesting problems while honing your skills.
Document Your Work: It’s crucial to showcase not only the results of your projects but also how you arrived at them. Platforms like GitHub or Hugging Face are excellent for sharing your code with the world. Write clear README files, explaining your approach, the tools you used, and the results you achieved. This documentation shows employers that you can explain and communicate your work, which is a highly valuable skill in any tech field.
Participate in Competitions: Getting involved in Kaggle competitions is another way to stand out. Competitions often present real-world challenges and give you the opportunity to apply your skills in a competitive environment. Many hiring managers look for candidates who have practical experience, and 70% of them prefer to see personal project portfolios when reviewing candidates, according to a LinkedIn survey.
Step4⃣: Networking and Job Search Strategies for Career Changers
Join Professional Networks: IEEE, ACM, and local AI meetups.
Attend Conferences: CVPR, ICCV, NeurIPS.
Leverage LinkedIn: Connect with professionals in the field and follow relevant groups and companies.
Job Search Tips:
Tailor your resume to highlight relevant skills.
Prepare for technical interviews with online platforms like LeetCode.
Consider internships or freelance projects to gain experience.
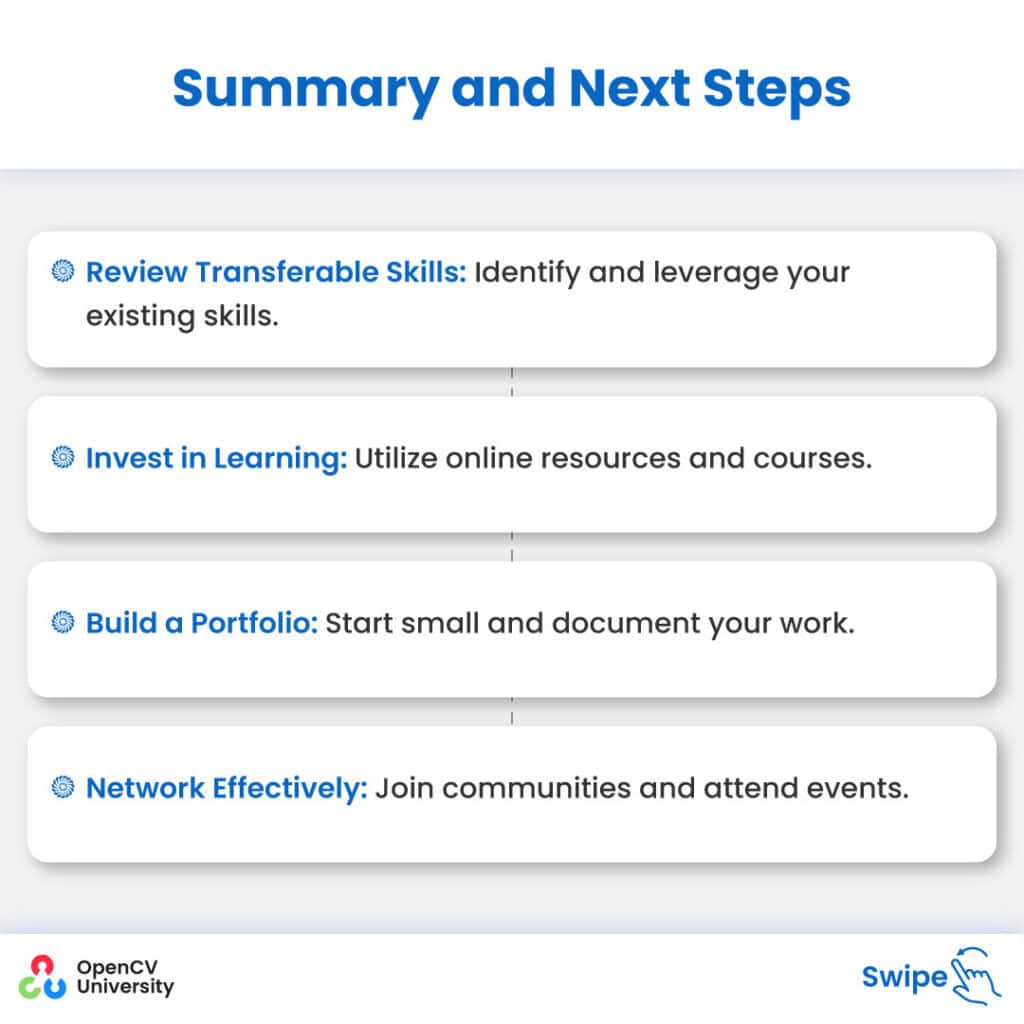
Summary and Next Steps
Transitioning into a computer vision career doesn’t have to be overwhelming. By focusing on your existing skills and leveraging the right resources, you can make this journey smoother and more manageable.
Here’s a quick recap of the steps to guide you forward:
Review Your Transferable Skills: Reflect on the programming, analytical, mathematical, and domain-specific knowledge you already possess. These can form a solid foundation as you move into computer vision.
Invest in Learning: Use beginner-friendly online courses, books, and other resources to build your expertise. Start with the basics and gradually explore more complex topics as you gain confidence.
Build a Portfolio: Start working on small, manageable projects, document your process, and share your work on platforms like GitHub or Hugging Face. A well-rounded portfolio will be critical when applying for jobs.
Network Effectively: Get involved in professional networks, attend industry conferences, and connect with professionals in the field. Building relationships and staying visible in the community will help open doors to job opportunities.
Accelerate Your Transition with Our Master Bundle – Make it Smoother!
If you’re looking for a structured and comprehensive way to fast-track your transition into computer vision, our Computer Vision + Deep Learning Master Bundle is the perfect choice. Tailored specifically for career changers, this bundle offers everything you need to build practical, industry-relevant skills in computer vision and deep learning.
Why Choose This Program?
Designed for Career Changers: The curriculum focuses on real-world applications, bridging the gap between your existing knowledge and the demands of computer vision roles.
Hands-On Learning: With projects and expert-led sessions, you’ll gain the practical experience that employers are looking for.
Supportive Community: Join a network of fellow learners and professionals who can provide guidance and support throughout your career transition.
Enroll Today: OpenCV University – CVDL Master Bundle. Start your journey toward a rewarding career in computer vision.
Not to be confused with the proposal a few days ago by an AMD engineer for Attack Vector Controls for broader control over CPU security mitigation handling, the in-development Linux 6.12 kernel is adding new Kconfig options to allow for more build-time control over what CPU security mitigation code is compiled for the kernel...
STMicro has just announced the availability of the STM32C071 Arm Cortex-M0+ microcontroller part of the STM32C0 series with 128 KB of flash and 24 KB of RAM suitable for driving a small 320 x 240 display using an SPI interface and building affordable graphical user interfaces (GUI) for appliances. The microcontroller also adds a crystal-less USB FS device interface, additional SPI and I2C interfaces, and extra GPIOs (up to 61) all of which are 5V tolerant. For evaluation and quickly get started with firmware development, STMicro also offers the NUCLEO-C071RB development board and X-NUCLEO-GFX01M2 display expansion board. STM32C071 low-cost Cortex-M0+ MCU for GUI in appliances STM32C071 specifications: MCU Core -Arm 32-bit Cortex-M0+ CPU @ up to 48 MHz Memory – Up to 24KB SRAM with HW parity check Storage – Up to 128KB flash with protection and securable area Peripheral interfaces Up to 61x fast I/Os, all 5V tolerant 5-channel [...]
Intel Compute Runtime 24.35.30872.22 released today as the newest tagged version of this open-source GPU compute stack providing oneAPI Level Zero and OpenCL support for Linux and Windows systems...
A few months back, we quietly dropped the Pico VS Code project on GitHub. It didn’t take long before the feedback started pouring in. Since then, we’ve been listening and tweaking. Now, we’re excited to officially unveil the public beta of the Raspberry Pi Pico Visual Studio Code Extension!
What is Pico VS Code?
Pico VS Code is a Microsoft Visual Studio Code extension designed to make your life easier when creating, developing, and debugging projects for Raspberry Pi Pico-series boards. Whether you’re a total beginner or a seasoned pro, this tool is here to help you dive into Pico development with confidence and ease.
If you’ve ever tried to set up an embedded development environment, you know it’s no small feat. Beginners often find themselves tangled up in the complexities of build systems, SDKs, and toolchains. And let’s not even get started on cross-compilation; developing on one machine to run code on another introduces a whole new set of challenges.
Getting all the right configurations and installations in place can be intimidating for everyone, not just those new to the game. Even experienced developers can find themselves tangled in frustrating setup processes that eat into valuable development time.
That’s why we created the Pico Visual Studio Code extension: a user-friendly tool that simplifies the entire development process. We wanted to offer something that takes the guesswork out of setting up your environment, so you can start coding in an interface you’re already familiar with — Visual Studio Code — as quickly as possible.
With Pico VS Code, you won’t have to worry about nitty-gritty details that trip up newcomers and sometimes stymie veterans. Instead, you’ll be able to focus on what really matters: bringing your Raspberry Pi Pico projects to life. Whether you’re working on your first blinking LED or a more complex project, Pico VSCode is there to help you get started and keep you moving forward.
How do I get Pico VS Code?
Prerequisites
To get started with the Pico VS Code extension, you’ll need to ensure that your development environment meets a few basic requirements. The extension is compatible with various platforms, including Raspberry Pi OS, Windows, macOS, and Linux, each with its own set of prerequisites.
All platforms require an install of Visual Studio Code version 1.92.1 or newer. For detailed instructions on setting up Pico VS Code on your platform, refer to the respective prerequisites outlined below.
Raspberry Pi OS
Ensure you are running a 64-bit distribution of Raspberry Pi OS.
Windows
Make sure you’re using a x86-based PC (not ARM64).
macOS
For macOS users, you can install all necessary dependencies by running the following command in your terminal:
xcode-select --install
Linux
Refer to the README.md on our GitHub page for a full list of required software. Many distros include the required software in the standard OS install.
Installing the Pico VS Code extension
You can install the extension in two ways. The first option is to install it directly from your editor’s marketplace. This provides a seamless integration and automatic updates. The second option is to download and manually install the package. This gives you more control and is helpful in restricted environments or when managing specific versions.
To create a project based on a blink example, select “New Project From Example” in the Pico sidebar panel added by the extension. Then, search for the example you want to use — in our case, “blink” — in the project name field. Click the “Create” button to generate a project from the template.
The blink example generated by pico-vscode
Once the project is generated, it will automatically open. When a Pico project is opened, the extension configures the build system for you based on the SDK version, board type, and other settings you’ve selected. After the progress bar disappears, you can compile the project by clicking the “Compile” button in the bottom right corner. This will open an output panel where you can follow the build progress. Once completed, you should see a line like this: [61/61] Linking CXX executable blink.elf.
When it comes to uploading firmware to your Raspberry Pi Pico board, you have two options. Both require you to connect your Pico in BOOTSEL mode. To put your Pico into BOOTSEL mode, connect your Pico board to your host computer while holding the BOOTSEL button.
The easiest way to get your firmware up and running is the “Run” button. Connect your Pico board in BOOTSEL mode, hit the “Run” button, and the firmware will upload automatically. You’ll know it’s working when the tiny LED near the USB connector starts blinking as the board disconnects itself.
In addition to the blink.elf executable, you’ll find a blink.uf2 file in the build directory within your project. If you prefer to manually flash firmware, drag and drop this UF2 file onto your Pico board in BOOTSEL mode.1 Once the file has been copied onto the board, it will automatically dismount and start running the blink project. You can confirm this by observing the tiny LED near the USB connector. It should start blinking as soon as the board disconnects itself.
For debugging directly within VS Code, the extension adds configuration to your project that allow you to use the debug panel and set breakpoints, just as you would when debugging other C/C++ projects on your computer. To run in debug mode with a Debug Probe, press F5. For detailed instructions on how to correctly wire your board for debugging, refer to the Getting Started guide on our website.2
Integrated offline documentation
When developing bare-metal code for the Pico, you often need to reference an API or check hardware specifications. To streamline your workflow, we’ve integrated the documentation directly into VS Code. This allows you to quickly access the information you need without leaving your editor — or requiring an internet connection.
A VS Code window showcasing a Pico project on the left with the offline documentation open to the right
To access the documentation, navigate to the Raspberry Pi Pico panel in your sidebar and select the topic you want to explore. The documentation will open within the editor, so you can position it wherever you need, just like any other file. This way, you can keep your code and reference materials side by side.
How to update the project configuration
A new SDK revision has been released, and you want to take advantage of its awesome new features in your Pico project. No problem — the extension has you covered. If you need to switch the target board, change the selected SDK, or adjust any other properties configured during project creation, the extension provides commands to update your project settings in just a few clicks.
For example, to switch the SDK version, you’ll find a UI element in the status bar at the bottom of the VS Code window, or in the Raspberry Pi Pico Project quick access panel in your sidebar, displaying your currently selected version. Clicking this will open a simple dialog where you can choose the new SDK version you want to use. Once selected, the extension will automatically reconfigure your project to use the new version. For optimal IntelliSense functionality, we recommended to reload your window after changing any project settings to ensure all extensions are aware of the new configuration. After the changes have been applied, the extension sends you a notification with a button that will reload the current window.
If you need to update settings other than the SDK version or board type, you can access additional commands via the VS Code command palette, which you can open with the keyboard shortcut Ctrl+Shift+P (or Cmd+Shift+P on macOS). Type “Raspberry Pi Pico,” and you’ll see a list of all available commands provided by the Pico extension. This makes it easy to adjust your project configuration as needed.
It also supports MicroPython
For beginners or developers who want to get their projects up and running on a Pico as quickly as possible, MicroPython is an excellent choice.3 It is a lean and efficient implementation of the Python 3 programming language, specifically designed to run on microcontrollers and in constrained environments. It includes a small subset of the Python standard library, making it a powerful yet lightweight option for embedded development.4
To create a Pico project using MicroPython instead of C/C++, select “New MicroPython Project”. You can find this button either in our Quick Access panel, located in your sidebar or by running the New Pico Project command and selecting MicroPython as language. This will launch the familiar project creation wizard, now tailored for setting up a MicroPython project. Choose the location for your project folder and set a name for your project. When you click “Create,” the extension generates the new project and opens it for you, just like with a C/C++ project. But instead of using C/C++, your new project uses the MicroPico extension to run your code on the board and manage project configurations.
A newly create MicroPython based MicroPico projectRaspberry Pi Pico W running the blink.py script in MicroPython
With MicroPython, you can quickly start prototyping and experimenting with your Raspberry Pi Pico-series device, making it an ideal option for both newcomers and seasoned developers alike.
Next steps
For more detailed information on using the Pico VS Code extension, including a comprehensive list of settings and additional guidance, visit our GitHub project page. It’s a great resource for getting the most out of the extension.
If you’re new to developing Pico projects, don’t forget to check out the Getting Started guide we mentioned earlier—it’s packed with helpful tips to get you up and running.
If you’re looking to create a project that leverages the advanced features of Pico-series devices — such as I2C, PIO, or enabling stdio support—be sure to explore the “New C/C++ Project” interface. This tool allows you to customize your project setup to suit your needs, so you can dive into development quickly and efficiently.
Merged as part of the Linux Security Modules (LSM) updates for the Linux 6.12 kernel is the new Integrity Policy Enforcement (IPE) module that has been years in the making. Integrity Policy Enforcement is an alternative to access controls...
Adafruit is set to enhance its Feather product line with the new Feather RP2350, featuring Raspberry Pi’s latest RP2350 chip. This upcoming board introduces a novel HSTX Port along with support for MicroPython and CircuitPython, making it accessible for both beginner and experienced developers. This board transitions from the dual M0 cores of its predecessor, […]
The QBiX-ADNAN97-A1 is an industrial-grade computing system engineered for robust performance and reliability. Featuring a compact, fanless design, it supports a DDR5 memory system, SATA 3.0, and dual GbE LAN ports, ensuring robust wired connectivity. As its name suggests, this industrial system features the Intel Processor N97, which is part of Intel’s 7 series. The […]
CircuitDigest recently launched LiteWing on Kickstarter, a Wi-Fi-controlled mini drone powered by the ESP32 microcontroller. Designed for hobbyists and engineers, LiteWing offers a fully programmable DIY platform, providing an affordable entry into drone technology for both beginners and advanced users. The drone’s design features a minimalistic PCB-based frame, making it lightweight and cost-effective. It uses […]


 Programming Skills: If you’re already familiar with languages like Python or C++, you’re on the right track. These languages are widely used in computer vision, particularly Python, due to libraries like OpenCV and TensorFlow. Even a basic understanding of coding can be a great starting point since many tutorials and projects will build on what you already know.
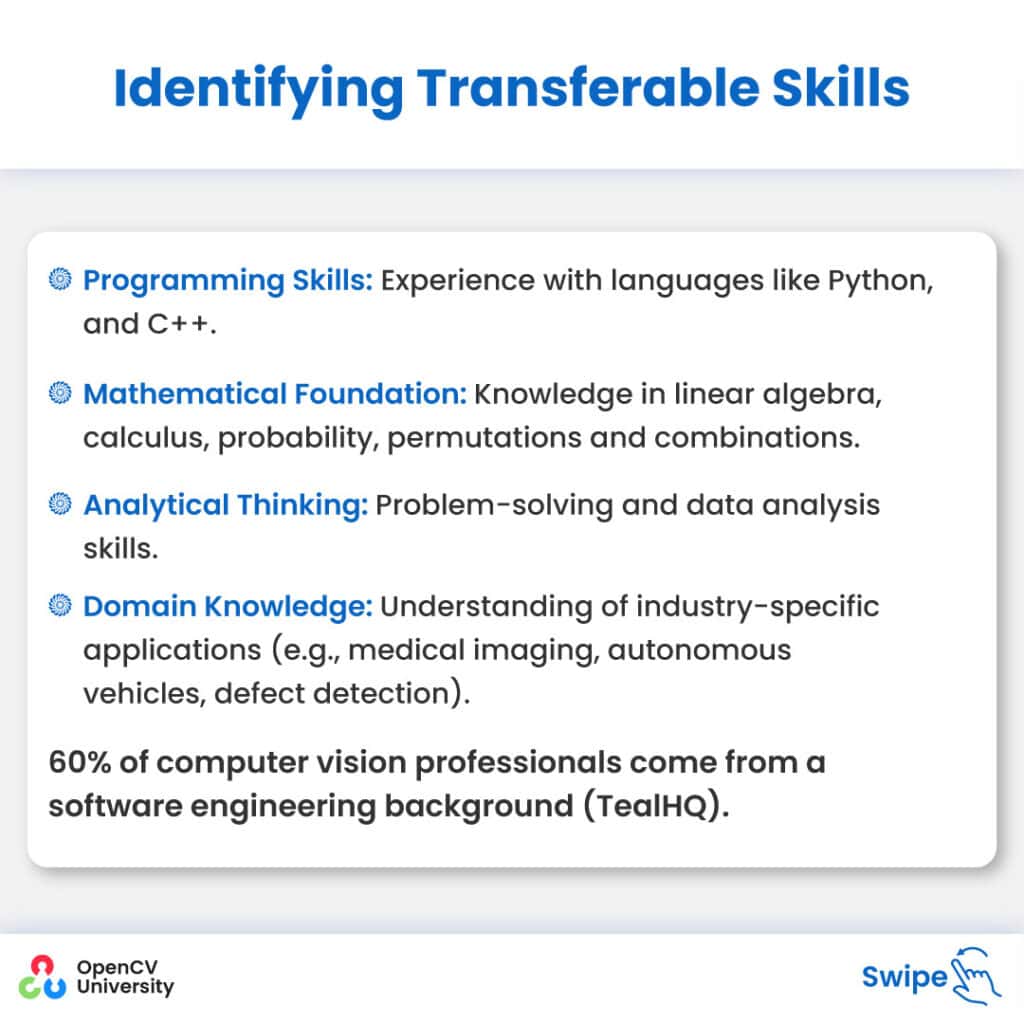
 Online Courses:
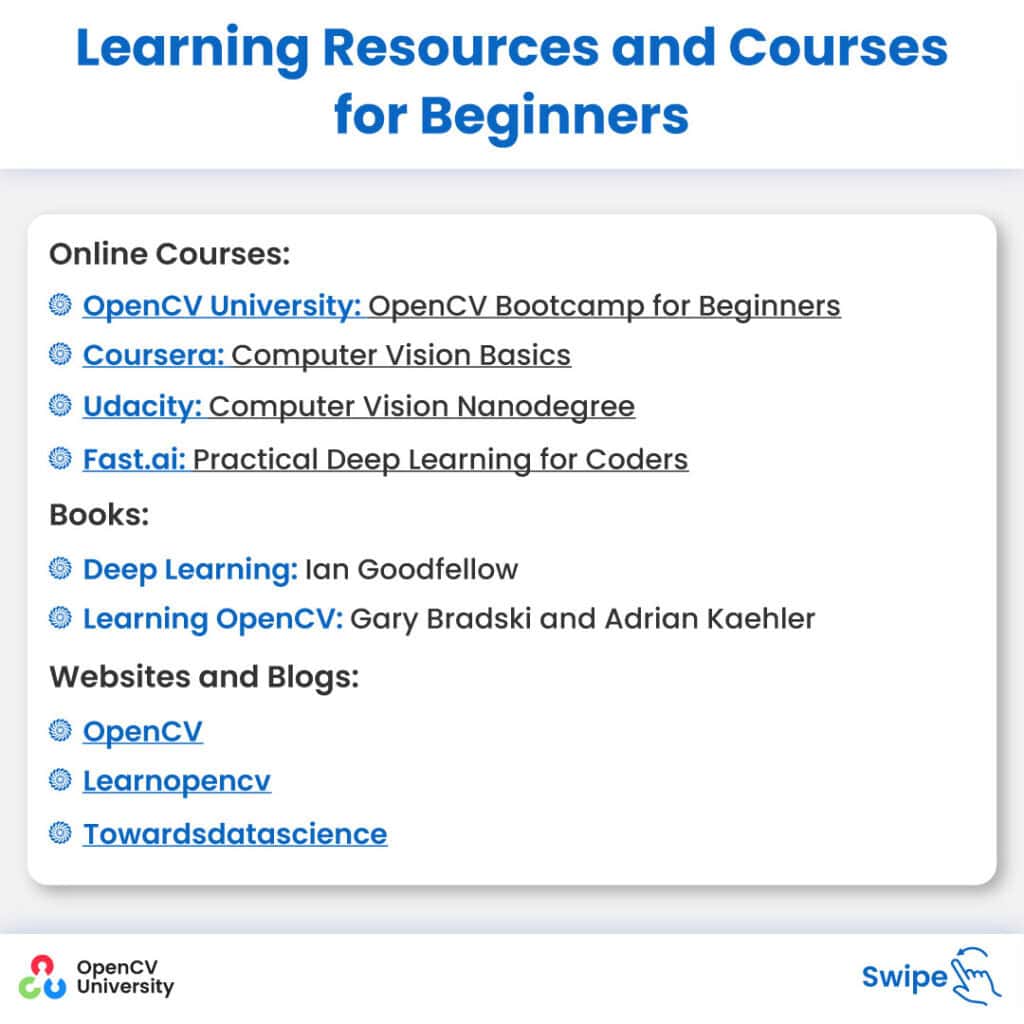
 Start Small: Begin with basic projects, such as image classification or object detection. These foundational tasks are relatively simple but show your ability to work with computer vision tools and datasets. You can find plenty of tutorials and datasets online to guide you through your first projects.
 Join Professional Networks: IEEE, ACM, and local AI meetups.
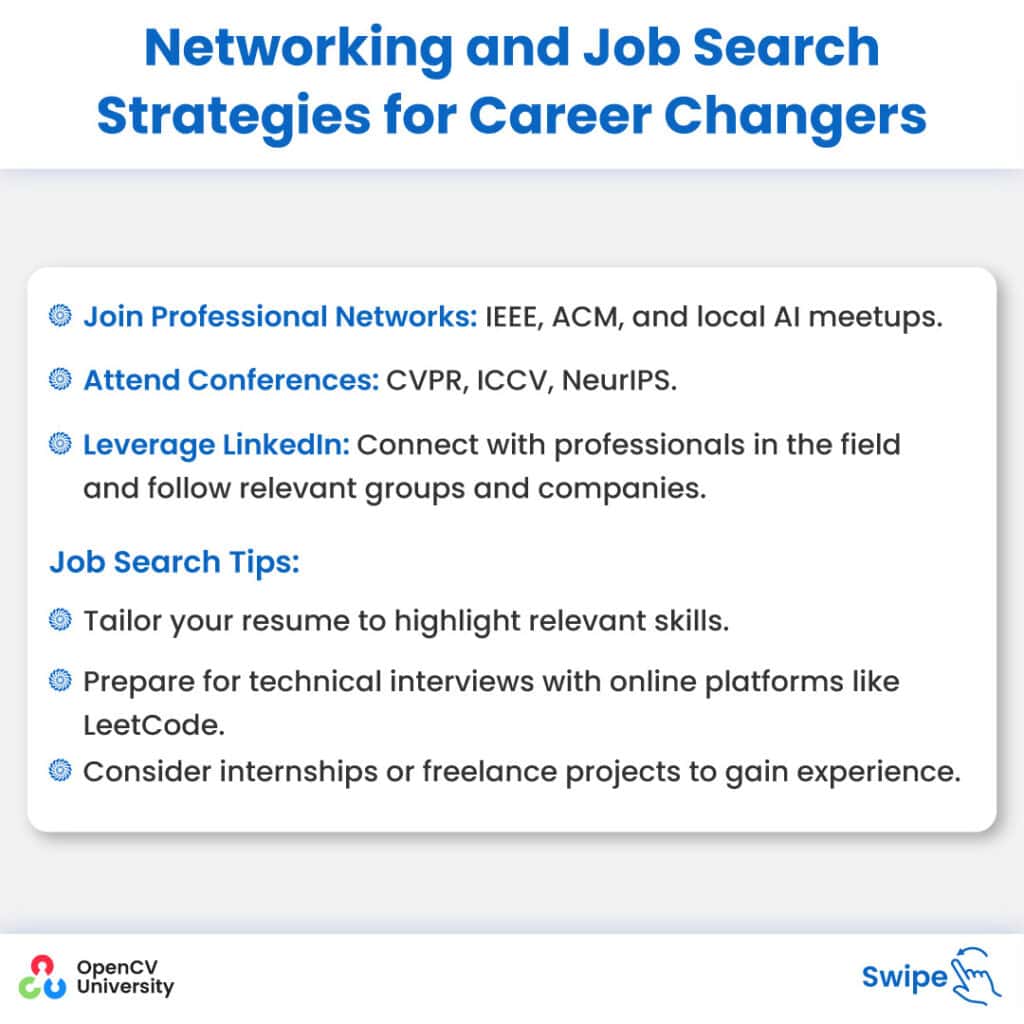
 Review Your Transferable Skills: Reflect on the programming, analytical, mathematical, and domain-specific knowledge you already possess. These can form a solid foundation as you move into computer vision.