Reading view

There are new articles available, click to refresh the page.

Bringing real-time edge AI applications to developers

In this guest post, Ramona Rayner from our partner Sony shows you how to quickly explore different models and AI capabilities, and how you can easily build applications on top of the Raspberry Pi AI Camera.

The recently launched Raspberry Pi AI Camera is an extremely capable piece of hardware, enabling you to build powerful AI applications on your Raspberry Pi. By offloading the AI inference to the IMX500 accelerator chip, more computational resources are available to handle application logic right on the edge! We are very curious to see what you will be creating and we are keen to give you more tools to do so. This post will cover how to quickly explore different models and AI capabilities, and how to easily build applications on top of the Raspberry Pi AI Camera.

If you didn’t have the chance to go through the Getting Started guide, make sure to check that out first to verify that your AI Camera is set up correctly.

Explore pre-trained models

A great way to start exploring the possibilities of the Raspberry Pi AI Camera is to try out some of the pre-trained models that are available in the IMX500 Model Zoo. To simplify the exploration process, consider using a GUI Tool, designed to quickly upload different models and see the real-time inference results on the AI Camera.

In order to start the GUI Tool, make sure to have Node.js installed. (Verify Node.js is installed by running node --version in the terminal.) And build and run the tool by running the following commands in the root of the repository:

make build
./dist/run.sh

The GUI Tool will be accessible on http://127.0.0.1:3001. To see a model in action:

  • Add a custom model by clicking the ADD button located at the top right corner of the interface.
  • Provide the necessary details to add a custom network and upload the network.rpk file, and the (optional) labels.txt file.
  • Select the model and navigate to Camera Preview to see the model in action!

Here are just a few of the models available in the IMX500 Model Zoo:

Network NameNetwork TypePost ProcessorColor FormatPreserve Aspect RatioNetwork FileLabels File
mobilenet_v2packagedClassificationRGBTruenetwork.rpkimagenet_labels.txt
efficientdet_lite0_pppackagedObject Detection (EfficientDet Lite0)RGBTruenetwork.rpkcoco_labels.txt
deeplabv3pluspackagedSegmentationRGBFalsenetwork.rpk
posenetpackagedPose EstimationRGBFalsenetwork.rpk

Exploring the different models gives you insight into the camera’s capabilities and enables you to identify the model that best suits your requirements. When you think you’ve found it, it’s time to build an application.

Building applications

Plenty of CPU is available to run applications on the Raspberry Pi while model inference is taking place on the IMX500. To demonstrate this we’ll run a Workout Monitoring sample application.

The goal is to count real-time exercise repetitions by detecting and tracking people performing common exercises like pull-ups, push-ups, ab workouts and squats. The app will count repetitions for each person in the frame, making sure multiple people can work out simultaneously and compete while getting automated rep counting.

To run the example, clone the sample apps repository and make sure to download the HigherHRNet model from the Raspberry Pi IMX500 Model Zoo.

Make sure you have OpenCV with Qt available:

sudo apt install python3-opencv

And from the root of the repository run:

python3 -m venv venv --system-site-packages
source venv/bin/activate
cd examples/workout-monitor/
pip install -e .

Switching between exercises is straightforward; simply provide the appropriate --exercise argument as one of pullup, pushup, abworkout or squat.

workout-monitor --model /path/to/imx500_network_higherhrnet_coco.rpk
 --exercise pullup

Note that this application is running:

  • Model post-processing to interpret the model’s output tensor into bounding boxes and skeleton keypoints
  • A tracker module (ByteTrack) to give the detected people a unique ID so that you can count individual people’s exercise reps
  • A matcher module to increase the accuracy of the tracker results, by matching people over frames so as not to lose their IDs
  • CV2 visualisation to visualise the results of the detections and see the results of the application

And all of this in real time, on the edge, while the IMX500 is taking care of the AI inference!

Now both you and the AI Camera are testing out each other’s limits. How many pull-ups can you do?

We hope by this point you’re curious to explore further; you can discover more sample applications on GitHub.

The post Bringing real-time edge AI applications to developers appeared first on Raspberry Pi.
How to get started with your Raspberry Pi AI Camera

If you’ve got your hands on the Raspberry Pi AI Camera that we launched a few weeks ago, you might be looking for a bit of help to get up and running with it – it’s a bit different from our other camera products. We’ve raided our documentation to bring you this Getting started guide. If you work through the steps here you’ll have your camera performing object detection and pose estimation, even if all this is new to you. Then you can dive into the rest of our AI Camera documentation to take things further.

This image shows a Raspberry Pi setup on a wooden surface, featuring a Raspberry Pi board connected to an AI camera module via an orange ribbon cable. The Raspberry Pi board is attached to several cables: a red one on the left for power and a white HDMI cable on the right. The camera module sits in the lower right corner, with its lens facing up. Part of a white and red keyboard is visible on the right side of the image, and a small plant in a white pot is partially visible on the left. The scene suggests a Raspberry Pi project setup in progress.

Here we describe how to run the pre-packaged MobileNet SSD (object detection) and PoseNet (pose estimation) neural network models on the Raspberry Pi AI Camera.

Prerequisites

We’re assuming that you’re using the AI Camera attached to either a Raspberry Pi 4 or a Raspberry Pi 5. With minor changes, you can follow these instructions on other Raspberry Pi models with a camera connector, including the Raspberry Pi Zero 2 W and Raspberry Pi 3 Model B+.

First, make sure that your Raspberry Pi runs the latest software. Run the following command to update:

sudo apt update && sudo apt full-upgrade

The AI Camera has an integrated RP2040 chip that handles neural network model upload to the camera, and we’ve released a new RP2040 firmware that greatly improves upload speed. AI Cameras shipping from now onwards already have this update, and if you have an earlier unit, you can update it yourself by following the firmware update instructions in this forum post. This should take no more than one or two minutes, but please note before you start that it’s vital nothing disrupts the process. If it does – for example, if the camera becomes disconnected, or if your Raspberry Pi loses power – the camera will become unusable and you’ll need to return it to your reseller for a replacement. Cameras with the earlier firmware are entirely functional, and their performance is identical in every respect except for model upload speed.

Install the IMX500 firmware

In addition to updating the RP2040 firmware if required, the AI camera must download runtime firmware onto the IMX500 sensor during startup. To install these firmware files onto your Raspberry Pi, run the following command:

sudo apt install imx500-all

This command:

  • installs the /lib/firmware/imx500_loader.fpk and /lib/firmware/imx500_firmware.fpk firmware files required to operate the IMX500 sensor
  • places a number of neural network model firmware files in /usr/share/imx500-models/
  • installs the IMX500 post-processing software stages in rpicam-apps
  • installs the Sony network model packaging tools

NOTE: The IMX500 kernel device driver loads all the firmware files when the camera starts, and this may take several minutes if the neural network model firmware has not been previously cached. The demos we’re using here display a progress bar on the console to indicate firmware loading progress.

Reboot

Now that you’ve installed the prerequisites, restart your Raspberry Pi:

sudo reboot
The image shows a Raspberry Pi AI Camera Module. It's a small, square-shaped green circuit board with four yellow mounting holes at each corner. In the center, there's a black camera lens marked with "MU2351." An orange ribbon cable is attached to the bottom of the board, used for connecting the camera to a Raspberry Pi. The Raspberry Pi logo, a white raspberry outline, is visible on the left side of the board.

Run example applications

Once all the system packages are updated and firmware files installed, we can start running some example applications. As mentioned earlier, the Raspberry Pi AI Camera integrates fully with libcamera, rpicam-apps, and Picamera2. This blog post concentrates on rpicam-apps, but you’ll find more in our AI Camera documentation.

rpicam-apps

The rpicam-apps camera applications include IMX500 object detection and pose estimation stages that can be run in the post-processing pipeline. For more information about the post-processing pipeline, see the post-processing documentation.

The examples on this page use post-processing JSON files located in /usr/share/rpicam-assets/.

Object detection

The MobileNet SSD neural network performs basic object detection, providing bounding boxes and confidence values for each object found. imx500_mobilenet_ssd.json contains the configuration parameters for the IMX500 object detection post-processing stage using the MobileNet SSD neural network.

imx500_mobilenet_ssd.json declares a post-processing pipeline that contains two stages:

  1. imx500_object_detection, which picks out bounding boxes and confidence values generated by the neural network in the output tensor
  2. object_detect_draw_cv, which draws bounding boxes and labels on the image

The MobileNet SSD tensor requires no significant post-processing on your Raspberry Pi to generate the final output of bounding boxes. All object detection runs directly on the AI Camera.

The following command runs rpicam-hello with object detection post-processing:

rpicam-hello -t 0s --post-process-file /usr/share/rpi-camera-assets/imx500_mobilenet_ssd.json --viewfinder-width 1920 --viewfinder-height 1080 --framerate 30

After running the command, you should see a viewfinder that overlays bounding boxes on objects recognised by the neural network:

To record video with object detection overlays, use rpicam-vid instead:

rpicam-vid -t 10s -o output.264 --post-process-file /usr/share/rpi-camera-assets/imx500_mobilenet_ssd.json --width 1920 --height 1080 --framerate 30

You can configure the imx500_object_detection stage in many ways.

For example, max_detections defines the maximum number of objects that the pipeline will detect at any given time. threshold defines the minimum confidence value required for the pipeline to consider any input as an object.

The raw inference output data of this network can be quite noisy, so this stage also performs some temporal filtering and applies hysteresis. To disable this filtering, remove the temporal_filter config block.

Pose estimation

The PoseNet neural network performs pose estimation, labelling key points on the body associated with joints and limbs. imx500_posenet.json contains the configuration parameters for the IMX500 pose estimation post-processing stage using the PoseNet neural network.

imx500_posenet.json declares a post-processing pipeline that contains two stages:

  1. imx500_posenet, which fetches the raw output tensor from the PoseNet neural network
  2. plot_pose_cv, which draws line overlays on the image

The AI Camera performs basic detection, but the output tensor requires additional post-processing on your host Raspberry Pi to produce final output.

The following command runs rpicam-hello with pose estimation post-processing:

rpicam-hello -t 0s --post-process-file /usr/share/rpi-camera-assets/imx500_posenet.json --viewfinder-width 1920 --viewfinder-height 1080 --framerate 30

You can configure the imx500_posenet stage in many ways.

For example, max_detections defines the maximum number of bodies that the pipeline will detect at any given time. threshold defines the minimum confidence value required for the pipeline to consider input as a body.

Picamera2

For examples of image classification, object detection, object segmentation, and pose estimation using Picamera2, see the picamera2 GitHub repository.

Most of the examples use OpenCV for some additional processing. To install the dependencies required to run OpenCV, run the following command:

sudo apt install python3-opencv python3-munkres

Now download the picamera2 repository to your Raspberry Pi to run the examples. You’ll find example files in the root directory, with additional information in the README.md file.

Run the following script from the repository to run YOLOv8 object detection:

python imx500_object_detection_demo.py --model /usr/share/imx500-models/imx500_network_yolov8n_pp.rpk --ignore-dash-labels -r

To try pose estimation in Picamera2, run the following script from the repository:

python imx500_pose_estimation_higherhrnet_demo.py

To explore further, including how things work under the hood and how to convert existing models to run on the Raspberry Pi AI Camera, see our documentation.

The post How to get started with your Raspberry Pi AI Camera appeared first on Raspberry Pi.

Raspberry Pi AI Camera on sale now at $70

People have been using Raspberry Pi products to build artificial intelligence projects for almost as long as we’ve been making them. As we’ve released progressively more powerful devices, the range of applications that we can support natively has increased; but in any generation there will always be some workloads that require an external accelerator, like the Raspberry Pi AI Kit, which we launched in June.

The AI Kit is an awesomely powerful piece of hardware, capable of performing thirteen trillion operations per second. But it is only compatible with Raspberry Pi 5, and requires a separate camera module to capture visual data. We are very excited therefore to announce a new addition to our camera product line: the Raspberry Pi AI Camera.

This image features a Raspberry Pi AI Camera Module connected to a long, curved orange ribbon cable. The small, square-shaped green circuit board has a black camera lens at its center and yellow mounting holes at each corner. The ribbon cable is flexed into a loop and prominently displays white text that reads "Raspberry Pi Camera Cable Standard – Mini – 200mm." The cable is designed to connect the camera to a Raspberry Pi device, and the image is set against a plain gray background.

The AI Camera is built around a Sony IMX500 image sensor with an integrated AI accelerator. It can run a wide variety of popular neural network models, with low power consumption and low latency, leaving the processor in your Raspberry Pi free to perform other tasks.

Key features of the Raspberry Pi AI Camera include:

  • 12 MP Sony IMX500 Intelligent Vision Sensor
  • Sensor modes: 4056×3040 at 10fps, 2028×1520 at 30fps
  • 1.55 µm × 1.55 µm cell size
  • 78-degree field of view with manually adjustable focus
  • Integrated RP2040 for neural network and firmware management

The AI Camera can be connected to all Raspberry Pi models, including Raspberry Pi Zero, using our regular camera ribbon cables.

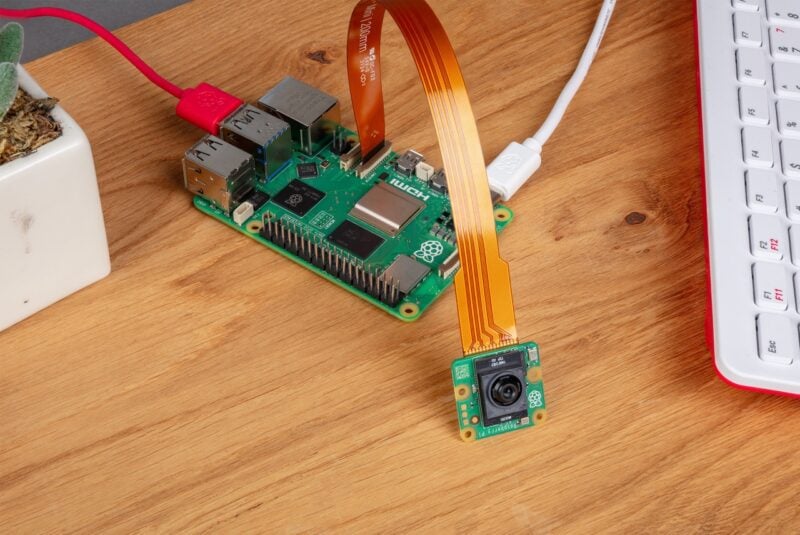
This image shows a Raspberry Pi setup on a wooden surface, featuring a Raspberry Pi board connected to an AI camera module via an orange ribbon cable. The Raspberry Pi board is attached to several cables: a red one on the left for power and a white HDMI cable on the right. The camera module sits in the lower right corner, with its lens facing up. Part of a white and red keyboard is visible on the right side of the image, and a small plant in a white pot is partially visible on the left. The scene suggests a Raspberry Pi project setup in progress.

Using Sony’s suite of AI tools, existing neural network models using frameworks such as TensorFlow or PyTorch can be converted to run efficiently on the AI Camera. Alternatively, new models can be designed to take advantage of the AI accelerator’s specific capabilities.

Under the hood

To make use of the integrated AI accelerator, we must first upload a model. On older Raspberry Pi devices this process uses the I2C protocol, while on Raspberry Pi 5 we are able to use a much faster custom two-wire protocol. The camera end of the link is managed by an on-board RP2040 microcontroller; an attached 16MB flash device caches recently used models, allowing us to skip the upload step in many cases.

The image shows a Raspberry Pi AI Camera Module. It's a small, square-shaped green circuit board with four yellow mounting holes at each corner. In the center, there's a black camera lens marked with "MU2351." An orange ribbon cable is attached to the bottom of the board, used for connecting the camera to a Raspberry Pi. The Raspberry Pi logo, a white raspberry outline, is visible on the left side of the board.

Once the sensor has started streaming, the IMX500 operates as a standard Bayer image sensor, much like the one on Raspberry Pi Camera Module 3. An integrated Image Signal Processor (ISP) performs basic image processing steps on the sensor frame (principally Bayer-to-RGB conversion and cropping/rescaling), and feeds the processed frame directly into the AI accelerator. Once the neural network model has processed the frame, its output is transferred to the host Raspberry Pi together with the Bayer frame over the CSI-2 camera bus.

This image shows a clean, organized desk setup. At the center, there is a laptop with a screen displaying data analysis or machine learning model results, with performance metrics shown in percentages. The laptop is identified as taking up 73% of the image.

On the left side, there's a small potted plant (50%) inside a decorative, geometric-patterned vase (43%). A computer mouse (50%) rests beside the plant.

On the right side, a coffee mug (42%) sits alone, adding a simple personal touch to the workspace.

The overall vibe is minimalist and focused, with soft lighting and a light-colored background.

Integration with Raspberry Pi libcamera

A key benefit of the AI Camera is its seamless integration with our Raspberry Pi camera software stack. Under the hood, libcamera processes the Bayer frame using our own ISP, just as it would for any sensor.

We also parse the neural network results to generate an output tensor, and synchronise it with the processed Bayer frame. Both of these are returned to the application during libcamera’s request completion step.

This image shows a close-up of a Raspberry Pi board with an attached AI camera module. The Raspberry Pi board, a small green circuit board with various electronic components, is partially visible in the upper part of the image. Connected to it is a camera module with a lens, positioned in the lower portion of the image. A flat orange ribbon cable links the camera to the Raspberry Pi, allowing it to transmit data. The background is a plain, muted teal color, making the electronics the clear focus of the image.

The Raspberry Pi camera frameworks — Picamera2 and rpicam-apps, and indeed any libcamera-based application — can retrieve the output tensor, correctly synchronised with the sensor frame. Here’s an example of an object detection neural network model (MobileNet SSD) running under rpicam-apps and performing inference on a 1080p video at 30fps.

This demo uses the postprocessing framework in rpicam-apps to generate object bounding boxes from the output tensor and draw them on the image. This stage takes no more than 300 lines of code to implement. An equivalent application built using Python and Picamera2 requires many fewer lines of code.

Another example below shows a pose estimation neural network model (PoseNet) performing inference on a 1080p video at 30fps.

Although these examples were recorded using a Raspberry Pi 4, they run with the same inferencing performance on a Raspberry Pi Zero!

Together with Sony, we have released a number of popular visual neural network models optimised for the AI Camera in our model zoo, along with visualisation example scripts using Picamera2.

Which product should I buy?

Should you buy a Raspberry Pi AI Kit, or a Raspberry Pi AI Camera? The AI Kit has higher theoretical performance than the AI Camera, and can support a broader range of models, but is only compatible with Raspberry Pi 5. The AI Camera is more compact, has a lower total cost if you don’t already own a camera, and is compatible with all models of Raspberry Pi.

Ultimately, both products provide great acceleration performance for common models, and both have been optimised to work smoothly with our camera software stack.

Getting started and going further

Check out our Getting Started Guide. There you’ll find instructions on installing the AI Camera hardware, setting up the software environment, and running the examples and neural networks in our model zoo.

This image shows a Raspberry Pi AI Camera Module connected to a long, flat, orange ribbon cable. The camera module is small, square-shaped, and green with a black lens in the center. There are yellow mounting holes at each corner of the module. The orange ribbon cable attached to the module has white regulatory symbols and logos printed on it, such as "UKCA," "CE," "FCC," and the Raspberry Pi logo. The cable appears to be flexible and designed for connecting the camera to a Raspberry Pi. The camera is resting on a light gray background.

Sony’s AITRIOS Developer site has more technical resources on the IMX500 sensor, in particular the IMX500 Converter and IMX500 Package documentation, which will be useful for users who want to run custom-trained networks on the AI Camera.

We’ve been inspired by the incredible AI projects you’ve built over the years with Raspberry Pi, and your hard work and inventiveness encourages us to invest in the tools that will help you go further. The arrival of first the AI Kit, and now the AI Camera, opens up a whole new world of opportunities for high-resolution, high-frame rate, high-quality visual AI: we don’t know what you’re going to build with them, but we’re sure it will be awesome.

The post Raspberry Pi AI Camera on sale now at $70 appeared first on Raspberry Pi.

❌