Reading view

There are new articles available, click to refresh the page.

Enhancing Container Security with Docker Scout and Secure Repositories

Docker Scout simplifies the integration with container image repositories, improving the efficiency of container image approval workflows without disrupting or replacing current processes. Positioned outside the repository’s stringent validation framework, Docker Scout serves as a proactive measure to significantly reduce the time needed for an image to gain approval. 

By shifting security checks left and integrating Docker Scout into the early stages of the development cycle, issues are identified and addressed directly on the developer’s machine.

2400x1260 generic scout blog d

Minimizing vulnerabilities 

This leftward shift in security accelerates the development process by keeping developers in flow, providing immediate feedback on policy violations at the point of development. As a result, images are secured and reviewed for compliance before being pushed into the continuous integration/continuous deployment (CI/CD) pipeline, reducing reliance on resource-heavy, consumption-based scans (Figure 1). By resolving issues earlier, Docker Scout minimizes the number of vulnerabilities detected during the CI/CD process, freeing up the security team to focus on higher-priority tasks.
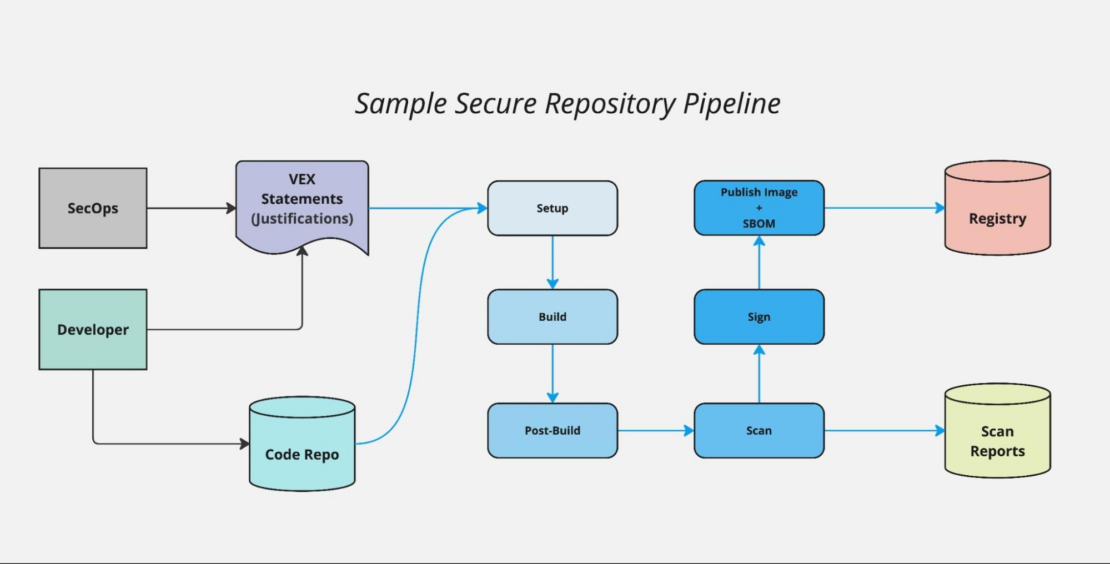
Sample secure repo pipeline showing images are secured and reviewed for compliance before being pushed into the continuous integration/continuous deployment (CI/CD) pipeline, reducing reliance on resource-heavy, consumption-based scans.
Figure 1: Sample secure repository pipeline.

Additionally, the Docker Scout console allows the security team to define custom security policies and manage VEX (Vulnerability Exploitability eXchange) statements. VEX is a standard that allows vendors and other parties to communicate the exploitability status of vulnerabilities, allowing for the creation of justifications for including software that has been tied to Common Vulnerabilities and Exposures (CVE).

This feature enables seamless collaboration between development and security teams, ensuring that developers are working with up-to-date compliance guidelines. The Docker Scout console can also feed critical data into existing security tooling, enriching the organization’s security posture with more comprehensive insights and enhancing overall protection (Figure 2).
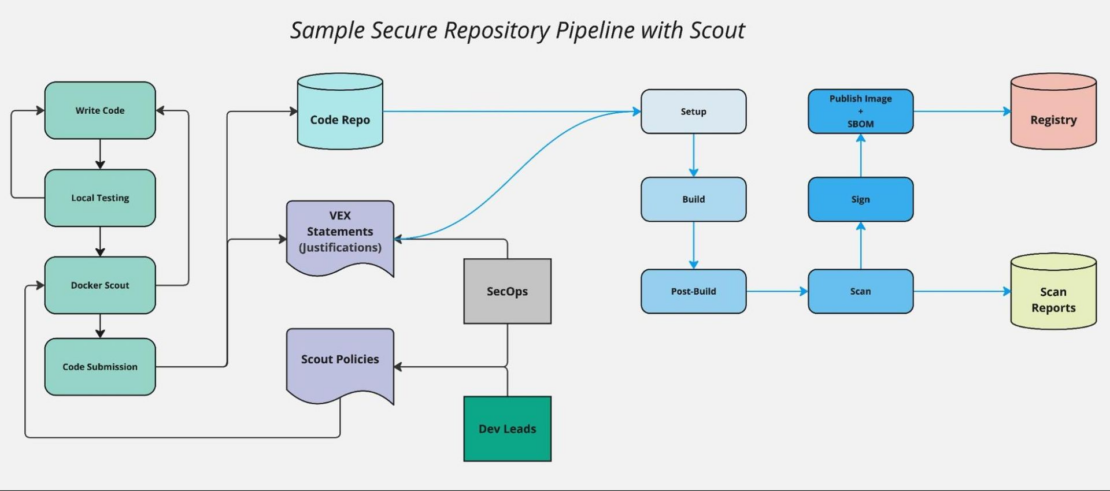
Sample secure repo pipeline with scout: The Docker Scout console can also feed critical data into existing security tooling, enriching the organization’s security posture with more comprehensive insights and enhancing overall protection.
Figure 2: Sample secure repository pipeline with Docker Scout.

How to secure image repositories

A secure container image repository provides digitally signed, OCI-compliant images that are rebuilt and rescanned nightly. These repositories are typically used in highly regulated or security-conscious environments, offering a wide range of container images, from open source software to commercial off-the-shelf (COTS) products. Each image in the repository undergoes rigorous security assessments to ensure compliance with strict security standards before being deployed in restricted or sensitive environments.

Key components of the repository include a hardened source code repository and an OCI-compliant registry (Figure 3). All images are continuously scanned for vulnerabilities, stored secrets, problematic code, and compliance with various standards. Each image is assigned a score upon rebuild, determining its compliance and suitability for use. Scanning reports and justifications for any potential issues are typically handled using the VEX format.
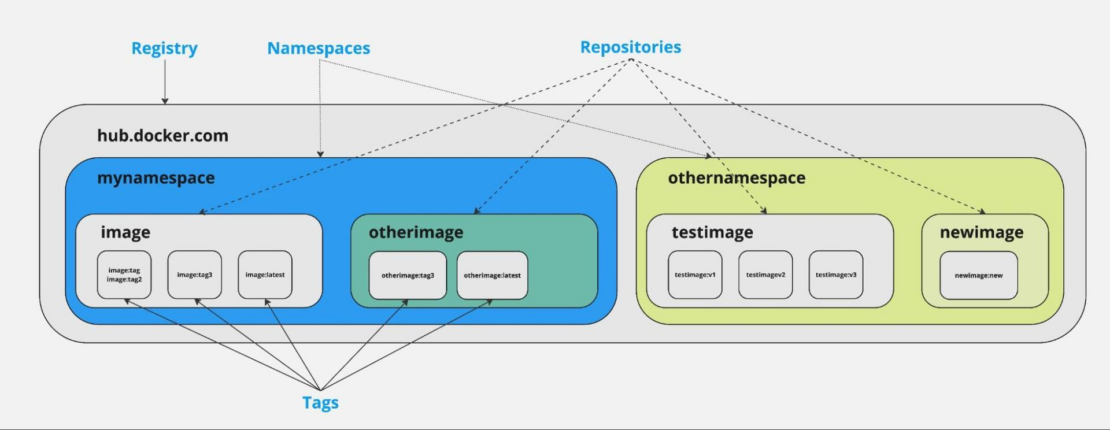
Key components of the repository include a hardened source code repository and an OCI-compliant registry
Figure 3: Key components of the repository include a hardened source code repository and an OCI-compliant registry.

Why use a hardened image repository?

A hardened image repository mitigates the security risks associated with deploying containers in sensitive or mission-critical environments. Traditional software deployment can expose organizations to vulnerabilities and misconfigurations that attackers can exploit. By enforcing a strict set of requirements for container images, the hardened image repository ensures that images meet the necessary security standards before deployment. Rebuilding and rescanning each image daily allows for continuous monitoring of new vulnerabilities and emerging attack vectors.

Using pre-vetted images from a hardened repository also streamlines the development process, reducing the load on development teams and enabling faster, safer deployment.

In addition to addressing security risks, the repository also ensures software supply chain security by incorporating software bills of materials (SBOMs) with each image. The SBOM of a container image can provide an inventory of all the components that were used to build the image, including operating system packages, application specific dependencies with its versions, and license information. By maintaining a robust vetting process, the repository guarantees that all software components are traceable, verifiable, and tamper-free — essential for ensuring the integrity and reliability of deployed software.

Who uses a hardened image repository?

The main users of a hardened container image repository include internal developers responsible for creating applications, developers working on utility images, and those responsible for building base images for other containerized applications. Note that the titles for these roles can vary by organization.

  • Application developers use the repository to ensure that the images their applications are built upon meet the required security and compliance standards.
  • DevOps engineers are responsible for building and maintaining the utility images that support various internal operations within the organization.
  • Platform developers create and maintain secure base images that other teams can use as a foundation for their containerized applications.

Daily builds

One challenge with using a hardened image repository is the time needed to approve images. Daily rebuilds are conducted to assess each image for vulnerabilities and policy violations, but issues can emerge, requiring developers to make repeated passes through the pipeline. Because rebuilds are typically done at night, this process can result in delays for development teams, as they must wait for the next rebuild cycle to resolve issues.

Enter Docker Scout

Integrating Docker Scout into the pre-submission phase can reduce the number of issues that enter the pipeline. This proactive approach helps speed up the submission and acceptance process, allowing development teams to catch issues before the nightly scans. 

Vulnerability detection and management

  • Requirement: Images must be free of known vulnerabilities at the time of submission to avoid delays in acceptance.
  • Docker Scout contribution:
    • Early detection: Docker Scout can scan Docker images during development to detect vulnerabilities early, allowing developers to resolve issues before submission.
    • Continuous analysis: Docker Scout continually reviews uploaded SBOMs, providing early warnings for new critical CVEs and ensuring issues are addressed outside of the nightly rebuild process.
    • Justification handling: Docker Scout supports VEX for handling exceptions. This can streamline the justification process, enabling developers to submit justifications for potential vulnerabilities more easily.

Security best practices and configuration management

  • Requirement: Images must follow security best practices and configuration guidelines, such as using secure base images and minimizing the attack surface.
  • Docker Scout contribution:
    • Security posture enhancement: Docker Scout allows teams to set policies that align with repository guidelines, checking for policy violations such as disallowed software or unapproved base images.

Compliance with dependency management

  • Requirement: All dependencies must be declared, and internet access during the build process is usually prohibited.
  • Docker Scout contribution:
    • Dependency scanning: Docker Scout identifies outdated or vulnerable libraries included in the image.
    • Automated reports: Docker Scout generates security reports for each dependency, which can be used to cross-check the repository’s own scanning results.

Documentation and provenance

  • Requirement: Images must include detailed documentation on their build process, dependencies, and configurations for auditing purposes.
  • Docker Scout contribution:
    • Documentation support: Docker Scout contributes to security documentation by providing data on the scanned image, which can be used as part of the official documentation submitted with the image.

Continuous compliance

  • Requirement: Even after an image is accepted into the repository, it must remain compliant with new security standards and vulnerability disclosures.
  • Docker Scout contribution:
    • Ongoing monitoring: Docker Scout continuously monitors images, identifying new vulnerabilities as they emerge, ensuring that images in the repository remain compliant with security policies.

By utilizing Docker Scout in these areas, developers can ensure their images meet the repository’s rigorous standards, thereby reducing the time and effort required for submission and review. This approach helps align development practices with organizational security objectives, enabling faster deployment of secure, compliant containers.

Integrating Docker Scout into the CI/CD pipeline

Integrating Docker Scout into an organization’s CI/CD pipeline can enhance image security from the development phase through to deployment. By incorporating Docker Scout into the CI/CD process, the organization can automate vulnerability scanning and policy checks before images are pushed into production, significantly reducing the risk of deploying insecure or non-compliant images.

  • Integration with build pipelines: During the build stage of the CI/CD pipeline, Docker Scout can be configured to automatically scan Docker images for vulnerabilities and adherence to security policies. The integration would typically involve adding a Docker Scout scan as a step in the build job, for example through a GitHub action. If Docker Scout detects any issues such as outdated dependencies, vulnerabilities, or policy violations, the build can be halted, and feedback is provided to developers immediately. This early detection helps resolve issues long before images are pushed to the hardened image repository.
  • Validation in the deployment pipeline: As images move from development to production, Docker Scout can be used to perform final validation checks. This step ensures that any security issues that might have arisen since the initial build have been addressed and that the image is compliant with the latest security policies. The deployment process can be gated based on Docker Scout’s reports, preventing insecure images from being deployed. Additionally, Docker Scout’s continuous analysis of SBOMs means that even after deployment, images can be monitored for new vulnerabilities or compliance issues, providing ongoing protection throughout the image lifecycle.

By embedding Docker Scout directly into the CI/CD pipeline (Figure 1), the organization can maintain a proactive approach to security, shifting left in the development process while ensuring that each image deployed is safe, compliant, and up-to-date.

Defense in depth and Docker Scout’s role

In any organization that values security, adopting a defense-in-depth strategy is essential. Defense in depth is a multi-layered approach to security, ensuring that if one layer of defense is compromised, additional safeguards are in place to prevent or mitigate the impact. This strategy is especially important in environments that handle sensitive data or mission-critical operations, where even a single vulnerability can have significant consequences.

Docker Scout plays a vital role in this defense-in-depth strategy by providing a proactive layer of security during the development process. Rather than relying solely on post-submission scans or production monitoring, Docker Scout integrates directly into the development and CI/CD workflows (Figure 2), allowing teams to catch and resolve security issues early. This early detection prevents issues from escalating into more significant risks later in the pipeline, reducing the burden on the SecOps team and speeding up the deployment process.

Furthermore, Docker Scout’s continuous monitoring capabilities mean that images are not only secure at the time of deployment but remain compliant with evolving security standards and new vulnerabilities that may arise after deployment. This ongoing vigilance forms a crucial layer in a defense-in-depth approach, ensuring that security is maintained throughout the entire lifecycle of the container image.

By integrating Docker Scout into the organization’s security processes, teams can build a more resilient, secure, and compliant software environment, ensuring that security is deeply embedded at every stage from development to deployment and beyond.

Learn more

Docker Best Practices: Using ARG and ENV in Your Dockerfiles

If you’ve worked with Docker for any length of time, you’re likely accustomed to writing or at least modifying a Dockerfile. This file can be thought of as a recipe for a Docker image; it contains both the ingredients (base images, packages, files) and the instructions (various RUN, COPY, and other commands that help build the image).

In most cases, Dockerfiles are written once, modified seldom, and used as-is unless something about the project changes. Because these files are created or modified on such an infrequent basis, developers tend to rely on only a handful of frequently used instructions — RUN, COPY, and EXPOSE being the most common. Other instructions can enhance your image, making it more configurable, manageable, and easier to maintain. 

In this post, we will discuss the ARG and ENV instructions and explore why, how, and when to use them.

2400x1260 best practices

ARG: Defining build-time variables

The ARG instruction allows you to define variables that will be accessible during the build stage but not available after the image is built. For example, we will use this Dockerfile to build an image where we make the variable specified by the ARG instruction available during the build process.

FROM ubuntu:latest
ARG THEARG="foo"
RUN echo $THEARG
CMD ["env"]

If we run the build, we will see the echo foo line in the output:

$ docker build --no-cache -t argtest .
[+] Building 0.4s (6/6) FINISHED                                                                     docker:desktop-linux
<-- SNIP -->
 => CACHED [1/2] FROM docker.io/library/ubuntu:latest@sha256:8a37d68f4f73ebf3d4efafbcf66379bf3728902a8038616808f04e  0.0s
 => => resolve docker.io/library/ubuntu:latest@sha256:8a37d68f4f73ebf3d4efafbcf66379bf3728902a8038616808f04e34a9ab6  0.0s
 => [2/2] RUN echo foo                                                                                               0.1s
 => exporting to image                                                                                               0.0s
<-- SNIP -->

However, if we run the image and inspect the output of the env command, we do not see THEARG:

$ docker run --rm argtest
PATH=/usr/local/sbin:/usr/local/bin:/usr/sbin:/usr/bin:/sbin:/bin
HOSTNAME=d19f59677dcd
HOME=/root

ENV: Defining build and runtime variables

Unlike ARG, the ENV command allows you to define a variable that can be accessed both at build time and run time:

FROM ubuntu:latest
ENV THEENV="bar"
RUN echo $THEENV
CMD ["env"]

If we run the build, we will see the echo bar line in the output:

$ docker build -t envtest .
[+] Building 0.8s (7/7) FINISHED                                                                     docker:desktop-linux
<-- SNIP -->
 => CACHED [1/2] FROM docker.io/library/ubuntu:latest@sha256:8a37d68f4f73ebf3d4efafbcf66379bf3728902a8038616808f04e  0.0s
 => => resolve docker.io/library/ubuntu:latest@sha256:8a37d68f4f73ebf3d4efafbcf66379bf3728902a8038616808f04e34a9ab6  0.0s
 => [2/2] RUN echo bar                                                                                               0.1s
 => exporting to image                                                                                               0.0s
<-- SNIP -->

If we run the image and inspect the output of the env command, we do see THEENV set, as expected:

$ docker run --rm envtest
PATH=/usr/local/sbin:/usr/local/bin:/usr/sbin:/usr/bin:/sbin:/bin
HOSTNAME=f53f1d9712a9
THEENV=bar
HOME=/root

Overriding ARG

A more advanced use of the ARG instruction is to serve as a placeholder that is then updated at build time:

FROM ubuntu:latest
ARG THEARG
RUN echo $THEARG
CMD ["env"]

If we build the image, we see that we are missing a value for $THEARG:

$ docker build -t argtest .
<-- SNIP -->
 => CACHED [1/2] FROM docker.io/library/ubuntu:latest@sha256:8a37d68f4f73ebf3d4efafbcf66379bf3728902a8038616808f04e  0.0s
 => => resolve docker.io/library/ubuntu:latest@sha256:8a37d68f4f73ebf3d4efafbcf66379bf3728902a8038616808f04e34a9ab6  0.0s
 => [2/2] RUN echo $THEARG                                                                                           0.1s
 => exporting to image                                                                                               0.0s
 => => exporting layers                                                                                              0.0s
<-- SNIP -->

However, we can pass a value for THEARG on the build command line using the --build-arg argument. Notice that we now see THEARG has been replaced with foo in the output:

 => CACHED [1/2] FROM docker.io/library/ubuntu:latest@sha256:8a37d68f4f73ebf3d4efafbcf66379bf3728902a8038616808f04e  0.0s
 => => resolve docker.io/library/ubuntu:latest@sha256:8a37d68f4f73ebf3d4efafbcf66379bf3728902a8038616808f04e34a9ab6  0.0s
 => [2/2] RUN echo foo                                                                                               0.1s
 => exporting to image                                                                                               0.0s
 => => exporting layers                                                                                              0.0s
<-- SNIP -->

The same can be done in a Docker Compose file by using the args key under the build key. Note that these can be set as a mapping (THEARG: foo) or a list (- THEARG=foo):

services:
  argtest:
    build:
      context: .
      args:
        THEARG: foo

If we run docker compose up --build, we can see the THEARG has been replaced with foo in the output:

$ docker compose up --build
<-- SNIP -->
 => [argtest 1/2] FROM docker.io/library/ubuntu:latest@sha256:8a37d68f4f73ebf3d4efafbcf66379bf3728902a8038616808f04  0.0s
 => => resolve docker.io/library/ubuntu:latest@sha256:8a37d68f4f73ebf3d4efafbcf66379bf3728902a8038616808f04e34a9ab6  0.0s
 => CACHED [argtest 2/2] RUN echo foo                                                                                0.0s
 => [argtest] exporting to image                                                                                     0.0s
 => => exporting layers                                                                                              0.0s
<-- SNIP -->
Attaching to argtest-1
argtest-1  | PATH=/usr/local/sbin:/usr/local/bin:/usr/sbin:/usr/bin:/sbin:/bin
argtest-1  | HOSTNAME=d9a3789ac47a
argtest-1  | HOME=/root
argtest-1 exited with code 0

Overriding ENV

You can also override ENV at build time; this is slightly different from how ARG is overridden. For example, you cannot supply a key without a value with the ENV instruction, as shown in the following example Dockerfile:

FROM ubuntu:latest
ENV THEENV
RUN echo $THEENV
CMD ["env"]

When we try to build the image, we receive an error:

$ docker build -t envtest .
[+] Building 0.0s (1/1) FINISHED                                                                     docker:desktop-linux
 => [internal] load build definition from Dockerfile                                                                 0.0s
 => => transferring dockerfile: 98B                                                                                  0.0s
Dockerfile:3
--------------------
   1 |     FROM ubuntu:latest
   2 |
   3 | >>> ENV THEENV
   4 |     RUN echo $THEENV
   5 |
--------------------
ERROR: failed to solve: ENV must have two arguments

However, we can remove the ENV instruction from the Dockerfile:

FROM ubuntu:latest
RUN echo $THEENV
CMD ["env"]

This allows us to build the image:

$ docker build -t envtest .
<-- SNIP -->
 => [1/2] FROM docker.io/library/ubuntu:latest@sha256:8a37d68f4f73ebf3d4efafbcf66379bf3728902a8038616808f04e34a9ab6  0.0s
 => => resolve docker.io/library/ubuntu:latest@sha256:8a37d68f4f73ebf3d4efafbcf66379bf3728902a8038616808f04e34a9ab6  0.0s
 => CACHED [2/2] RUN echo $THEENV                                                                                    0.0s
 => exporting to image                                                                                               0.0s
 => => exporting layers                                                                                              0.0s
<-- SNIP -->

Then we can pass an environment variable via the docker run command using the -e flag:

$ docker run --rm -e THEENV=bar envtest
PATH=/usr/local/sbin:/usr/local/bin:/usr/sbin:/usr/bin:/sbin:/bin
HOSTNAME=638cf682d61f
THEENV=bar
HOME=/root

Although the .env file is usually associated with Docker Compose, it can also be used with docker run.

$ cat .env
THEENV=bar

$ docker run --rm --env-file ./.env envtest
PATH=/usr/local/sbin:/usr/local/bin:/usr/sbin:/usr/bin:/sbin:/bin
HOSTNAME=59efe1003811
THEENV=bar
HOME=/root

This can also be done using Docker Compose by using the environment key. Note that we use the variable format for the value:

services:
  envtest:
    build:
      context: .
    environment:
      THEENV: ${THEENV}

If we do not supply a value for THEENV, a warning is thrown:

$ docker compose up --build
WARN[0000] The "THEENV" variable is not set. Defaulting to a blank string.
<-- SNIP -->
 => [envtest 1/2] FROM docker.io/library/ubuntu:latest@sha256:8a37d68f4f73ebf3d4efafbcf66379bf3728902a8038616808f04  0.0s
 => => resolve docker.io/library/ubuntu:latest@sha256:8a37d68f4f73ebf3d4efafbcf66379bf3728902a8038616808f04e34a9ab6  0.0s
 => CACHED [envtest 2/2] RUN echo ${THEENV}                                                                          0.0s
 => [envtest] exporting to image                                                                                     0.0s
<-- SNIP -->
 ✔ Container dd-envtest-1    Recreated                                                                               0.1s
Attaching to envtest-1
envtest-1  | PATH=/usr/local/sbin:/usr/local/bin:/usr/sbin:/usr/bin:/sbin:/bin
envtest-1  | HOSTNAME=816d164dc067
envtest-1  | THEENV=
envtest-1  | HOME=/root
envtest-1 exited with code 0

The value for our variable can be supplied in several different ways, as follows:

  • On the compose command line:
$ THEENV=bar docker compose up

[+] Running 2/0
 ✔ Synchronized File Shares                                                                                          0.0s
 ✔ Container dd-envtest-1    Recreated                                                                               0.1s
Attaching to envtest-1
envtest-1  | PATH=/usr/local/sbin:/usr/local/bin:/usr/sbin:/usr/bin:/sbin:/bin
envtest-1  | HOSTNAME=20f67bb40c6a
envtest-1  | THEENV=bar
envtest-1  | HOME=/root
envtest-1 exited with code 0
  • In the shell environment on the host system:
$ export THEENV=bar
$ docker compose up

[+] Running 2/0
 ✔ Synchronized File Shares                                                                                          0.0s
 ✔ Container dd-envtest-1    Created                                                                                 0.0s
Attaching to envtest-1
envtest-1  | PATH=/usr/local/sbin:/usr/local/bin:/usr/sbin:/usr/bin:/sbin:/bin
envtest-1  | HOSTNAME=20f67bb40c6a
envtest-1  | THEENV=bar
envtest-1  | HOME=/root
envtest-1 exited with code 0
  • In the special .env file:
$ cat .env
THEENV=bar

$ docker compose up

[+] Running 2/0
 ✔ Synchronized File Shares                                                                                          0.0s
 ✔ Container dd-envtest-1    Created                                                                                 0.0s
Attaching to envtest-1
envtest-1  | PATH=/usr/local/sbin:/usr/local/bin:/usr/sbin:/usr/bin:/sbin:/bin
envtest-1  | HOSTNAME=20f67bb40c6a
envtest-1  | THEENV=bar
envtest-1  | HOME=/root
envtest-1 exited with code 0

Finally, when running services directly using docker compose run, you can use the -e flag to override the .env file.

$ docker compose run -e THEENV=bar envtest

[+] Creating 1/0
 ✔ Synchronized File Shares                                                                                          0.0s
PATH=/usr/local/sbin:/usr/local/bin:/usr/sbin:/usr/bin:/sbin:/bin
HOSTNAME=219e96494ddd
TERM=xterm
THEENV=bar
HOME=/root

The tl;dr

If you need to access a variable during the build process but not at runtime, use ARG. If you need to access the variable both during the build and at runtime, or only at runtime, use ENV.

To decide between them, consider the following flow (Figure 1):

build process

Both ARG and ENV can be overridden from the command line in docker run and docker compose, giving you a powerful way to dynamically update variables and build flexible workflows.

Learn more

Docker Best Practices: Using Tags and Labels to Manage Docker Image Sprawl

With many organizations moving to container-based workflows, keeping track of the different versions of your images can become a problem. Even smaller organizations can have hundreds of container images spanning from one-off development tests, through emergency variants to fix problems, all the way to core production images. This leads us to the question: How can we tame our image sprawl while still rapidly iterating our images?

A common misconception is that by using the “latest” tag, you are guaranteeing that you are pulling the “latest version of the image. Unfortunately, this assumption is wrong — all latest means is “the last image pushed to this registry.”

Read on to learn more about how to avoid this pitfall when using Docker and how to get a handle on your Docker images.

Docker Best Practices: Using Tags and Labels to Manage Docker Image Sprawl

Using tags

One way to address this issue is to use tags when creating an image. Adding one or more tags to an image helps you remember what it is intended for and helps others as well. One approach is always to tag images with their semantic versioning (semver), which lets you know what version you are deploying. This sounds like a great approach, and, to some extent, it is, but there is a wrinkle.

Unless you’ve configured your registry for immutable tags, tags can be changed. For example, you could tag my-great-app as v1.0.0 and push the image to the registry. However, nothing stops your colleague from pushing their updated version of the app with tag v1.0.0 as well. Now that tag points to their image, not yours. If you add in the convenience tag latest, things get a bit more murky.

Let’s look at an example:

FROM busybox:stable-glibc

# Create a script that outputs the version
RUN echo -e "#!/bin/sh\n" > /test.sh && \
    echo "echo \"This is version 1.0.0\"" >> /test.sh && \
    chmod +x /test.sh

# Set the entrypoint to run the script
ENTRYPOINT ["/bin/sh", "/test.sh"]

We build the above with docker build -t tagexample:1.0.0 . and run it.

$ docker run --rm tagexample:1.0.0
This is version 1.0.0

What if we run it without a tag specified?

$ docker run --rm tagexample
Unable to find image 'tagexample:latest' locally
docker: Error response from daemon: pull access denied for tagexample, repository does not exist or may require 'docker login'.
See 'docker run --help'.

Now we build with docker build . without specifying a tag and run it.

$ docker run --rm tagexample
This is version 1.0.0

The latest tag is always applied to the most recent push that did not specify a tag. So, in our first test, we had one image in the repository with a tag of 1.0.0, but because we did not have any pushes without a tag, the latest tag did not point to an image. However, once we push an image without a tag, the latest tag is automatically applied to it.

Although it is tempting to always pull the latest tag, it’s rarely a good idea. The logical assumption — that this points to the most recent version of the image — is flawed. For example, another developer can update the application to version 1.0.1, build it with the tag 1.0.1, and push it. This results in the following:

$ docker run --rm tagexample:1.0.1
This is version 1.0.1

$ docker run --rm tagexample:latest
This is version 1.0.0

If you made the assumption that latest pointed to the highest version, you’d now be running an out-of-date version of the image.

The other issue is that there is no mechanism in place to prevent someone from inadvertently pushing with the wrong tag. For example, we could create another update to our code bringing it up to 1.0.2. We update the code, build the image, and push it — but we forget to change the tag to reflect the new version. Although it’s a small oversight, this action results in the following:

$ docker run --rm tagexample:1.0.1
This is version 1.0.2

Unfortunately, this happens all too frequently.

Using labels

Because we can’t trust tags, how should we ensure that we are able to identify our images? This is where the concept of adding metadata to our images becomes important.

The first attempt at using metadata to help manage images was the MAINTAINER instruction. This instruction sets the “Author” field (org.opencontainers.image.authors) in the generated image. However, this instruction has been deprecated in favor of the more powerful LABEL instruction. Unlike MAINTAINER, the LABEL instruction allows you to set arbitrary key/value pairs that can then be read with docker inspect as well as other tooling.

Unlike with tags, labels become part of the image, and when implemented properly, can provide a much better way to determine the version of an image. To return to our example above, let’s see how the use of a label would have made a difference.

To do this, we add the LABEL instruction to the Dockerfile, along with the key version and value 1.0.2.

FROM busybox:stable-glibc

LABEL version="1.0.2"

# Create a script that outputs the version
RUN echo -e "#!/bin/sh\n" > /test.sh && \
    echo "echo \"This is version 1.0.2\"" >> /test.sh && \
    chmod +x /test.sh

# Set the entrypoint to run the script
ENTRYPOINT ["/bin/sh", "/test.sh"]

Now, even if we make the same mistake above where we mistakenly tag the image as version 1.0.1, we have a way to check that does not involve running the container to see which version we are using.

$ docker inspect --format='{{json .Config.Labels}}' tagexample:1.0.1
{"version":"1.0.2"}

Best practices

Although you can use any key/value as a LABEL, there are recommendations. The OCI provides a set of suggested labels within the org.opencontainers.image namespace, as shown in the following table:

LabelContent
org.opencontainers.image.createdThe date and time on which the image was built (string, RFC 3339 date-time).
org.opencontainers.image.authorsContact details of the people or organization responsible for the image (freeform string).
org.opencontainers.image.urlURL to find more information on the image (string).
org.opencontainers.image.documentationURL to get documentation on the image (string).
org.opencontainers.image.sourceURL to the source code for building the image (string).
org.opencontainers.image.versionVersion of the packaged software (string).
org.opencontainers.image.revisionSource control revision identifier for the image (string).
org.opencontainers.image.vendorName of the distributing entity, organization, or individual (string).
org.opencontainers.image.licensesLicense(s) under which contained software is distributed (string, SPDX License List).
org.opencontainers.image.ref.nameName of the reference for a target (string).
org.opencontainers.image.titleHuman-readable title of the image (string).
org.opencontainers.image.descriptionHuman-readable description of the software packaged in the image (string).

Because LABEL takes any key/value, it is also possible to create custom labels. For example, labels specific to a team within a company could use the com.myorg.myteam namespace. Isolating these to a specific namespace ensures that they can easily be related back to the team that created the label.

Final thoughts

Image sprawl is a real problem for organizations, and, if not addressed, it can lead to confusion, rework, and potential production problems. By using tags and labels in a consistent manner, it is possible to eliminate these issues and provide a well-documented set of images that make work easier and not harder.

Learn more

❌